Controls
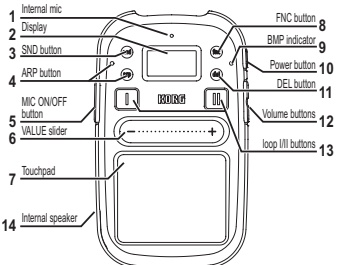
1. Internal mic
Sounds picked up by the internal mic will be used while you hold down the MIC
ON/OFF button.
Tip
Sound will not be output from the internal speaker while you're using the internal mic to avoid feedback.
2. Display
This shows information such as the program that's currently selected. The lower part of the screen functions as the slider guide.
3. SND (sound) button
This button takes you back to the screen where you can select a program.
4. ARP (arpeggiator) button and indicator
This button the arpeggiator on/off, and allows you to adjust settings. Please refer to the Using the arpeggiator section. The indicator will light up when you are adjusting settings for the arpeggiator and when it is playing.
5. MIC ON/OFF button
Sounds picked up by the internal mic or from a mic that's connected to the MIC IN jack will be used while you hold down the MIC ON/OFF button.
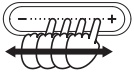
6. VALUE slider
You can change programs or edit a value by sliding or tapping your finger on this slider. Striking the slider will change the value smoothly. To change the value in steps of one, press either end of the slider.
Warning
Do not use a hard or sharp object to operate the slider. Also, the slider might not work if you attempt to operate it with an object other than your finger, or while wearing gloves.
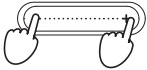
7. Touchpad
Please refer to the Performing with the touchpad section.
8. FNC (function) button
Use this button to adjust various settings. Repeatedly press the FNC button to select the menu item that you want to set.
Tip
By holding down the SND button and pressing the FNC button. you can step through the menu items in reverse order.
9. BPM (tempo) indicator
This indicator will light up in time with the current tempo.
10. Power button
Please refer to the Turning the power on/off section.
11. DEL (delete) button
Please refer to the Partially erasing a recorded phrase and Erasing a phrase completely section.
12. Volume buttons
Use these buttons to adjust the volume of the headphones or the internal speaker. You can adjust the input volume by holding down the MIC ON/OFF button and using these buttons.
13. Loop I/II buttons
Please refer to the Loop recording section.
14. Internal speaker
The sound of your performance is played from this speaker. If you connect headphones to the PHONES jack, the internal speaker will not produce sound.
Tip
For some programs, the volume might be low or difficult to notice.

Setup menu contents
| Page | Item | Content | Default value |
|---|---|---|---|
| P-1/14 | BPM | Specifies the tempo for arpeggiator playback, etc. | 120.0 |
| P-2/14 | KEY | Specifies the key (pitch) that will be the root of the scale. 1 | C |
| P-3/14 | SCALE | Specifies the scale assigned to the touch pad. | Ionian |
| P-4/14 | NOTE RANGE | Specifies the octave range that can be played on the touchpad. 1 | Program |
| P-5/14 | ARP PATTERN | Specifies the arpeggio pattern. | Type:00 |
| P-6/14 | ARP TIME | Specifies the duration of the notes sounded by the arpeggiator. 1 | 0% |
| P-7/14 | ARP SWING | Adjusts the timing of the arpeggiator. | OFF |
| P-8/14 | LOOP I LENGTH | Specifies the length of the Loop I phrase. | 4Beat |
| P-9/14 | LOOP II LENGTH | Specifies the length of the Loop II phrase. | 4Beat |
| P-10/14 | LOOP FADER | Allows you to crossfade the volumes of Loops I and II. | CENTER |
| P-11/14 | LOOP SAVE/LOAD | Allows you to save or load data. | |
| P-12/14 | MASTER RECORDER | Records your kaossilator 2 performance onto the memory card. | |
| P-13/14 | AUDIO PLAYER | Plays back audio data from the memory card. | |
| P-14/14 | UTILITY | Tap the center of the VALUE slider to enter the UTILITY menu selections. |
Utility menu contents
Press the FNC button repeatedly until UTILITY appears; then tap the VALUE slider to make utility menu settings.
| Page | Item | Content |
|---|---|---|
| U-1/10 | DATE | Sets the date and time of the internal clock. This information is used to time-stamp files. |
| U-2/10 | BATTERY TYPE | Specifies the type of battery you're using. |
| U-3/10 | POWER SAVING | Lowers the power consumption of the kaosillator 2 by limiting the speaker output, extending the battery life. |
| U-4/10 | AUTO POWER OFF | Specifies whether the kaosillator 2 will automatically power-off (after four hours). 2 |
| U-5/10 | DISPLAY BRIGHTNESS | Adjusts the brightness of the screen. 3 |
| U-6/10 | EXT.MIC SETTING | Specifies the type of mic that is connected. |
| U-7/10 | CARD TEST | Tests the inserted memory card to check whether it can be used with the kaosillator 2. |
| U-8/10 | CARD FORMAT | Checks and formats the memory card. |
| U-9/10 | PAD CALIBRATION | Calibrates the active region of the touchpad and VALUE slider. |
| U-10/10 | SOFTWARE UPDATE | Updates the system software of the kaosillator 2. For more details on updating the system, please refer to the Korg website. |
Tip
After you select this setting, the program display will reappear if you don't perform any operation for a while. By pressing the SND button you can immediately return to the program display.